Simple CRUD Using Spring Boot, Hibernate, JPA and PostgreSQL

IT Tips & Insights: A Softensity Java Developer shares a tutorial on creating a CRUD API using Spring Boot and PostgreSQL databases.
By Andre Picoli, Java Developer and Community Lead
This is a simple tutorial on how to create a CRUD API using Spring Boot and PostgreSQL databases. The example simulates a user subscription application that is able to Create/Read/Update/Delete users on this.
Tech Stack
Spring Boot
Spring Boot is an open-source micro-framework maintained by a company called Pivotal. It provides Java developers with a platform to get started with an auto configurable production-grade Spring application. The framework makes it simple to create standalone, production-grade Spring-based applications that you can “just run.”
JPA and Hibernate
Object-Relational Mapping (ORM) is the process of converting Java objects to database tables. This allows us to interact with a relational database without any SQL. The Java Persistence API (JPA) is a specification that defines how to persist data in Java applications. The primary focus of JPA is the ORM layer.
Hibernate is one of the most popular Java ORM frameworks in use today. Its first release was almost 20 years ago, and still has excellent community support and regular releases. Additionally, Hibernate is a standard implementation of the JPA specification, with a few additional features that are specific to Hibernate.
PostgreSQL
PostgreSQL is a powerful, open-source object-relational database system with over 30 years of active development. It has earned it a strong reputation for reliability, feature robustness, and performance.
Project Lombok
Java is a very popular language, but it has a few drawbacks. One of the biggest drawbacks is that we still need to write the boilerplate codes like getters and setters to String method in Java whereas Kotlin and Scala, which are also JVM based, don’t require this step. Hence, their increased popularity in the community. This is where Lombok comes into the picture and overcomes this drawback of Java.
Project Lombok is a java library tool that is used to minimize/remove the boilerplate code and save developers precious time during development by just using some annotations.
Gradle
As Maven, Gradle is a build automation tool for multi-language software development. It controls the development process in the tasks of compilation and packaging to testing, deployment, and publishing.
Now that we’ve reviewed the tech stacks, it’s time to get our hands dirty …
Setting Up the Project
Install Java 11
To work in Java, I recommend that you install version 11 because this recent version has many new features that can make our lives easier. I will not go deeper into this process as you can easily find out how to install version 11 on the Oracle website.
Spring initializr
For the first step, let’s take advantage of what we have in terms of practicality. Spring initializr is a website that helps you create a minimal setup of Spring Boot. You only need to describe what you’ll need to use in your project and it’ll import dependencies for you.
Access Spring initializr here (at https://start.spring.io/).
Don’t forget to add necessary dependencies:
- Spring web – it enables us to use restful apis collections.
- Lombok – avoid boilerplate code.
- Spring Data – enables us to use JPA
- PostgreSQL Driver – Import PostgreSQL connector to database.
The configuration must be like this:
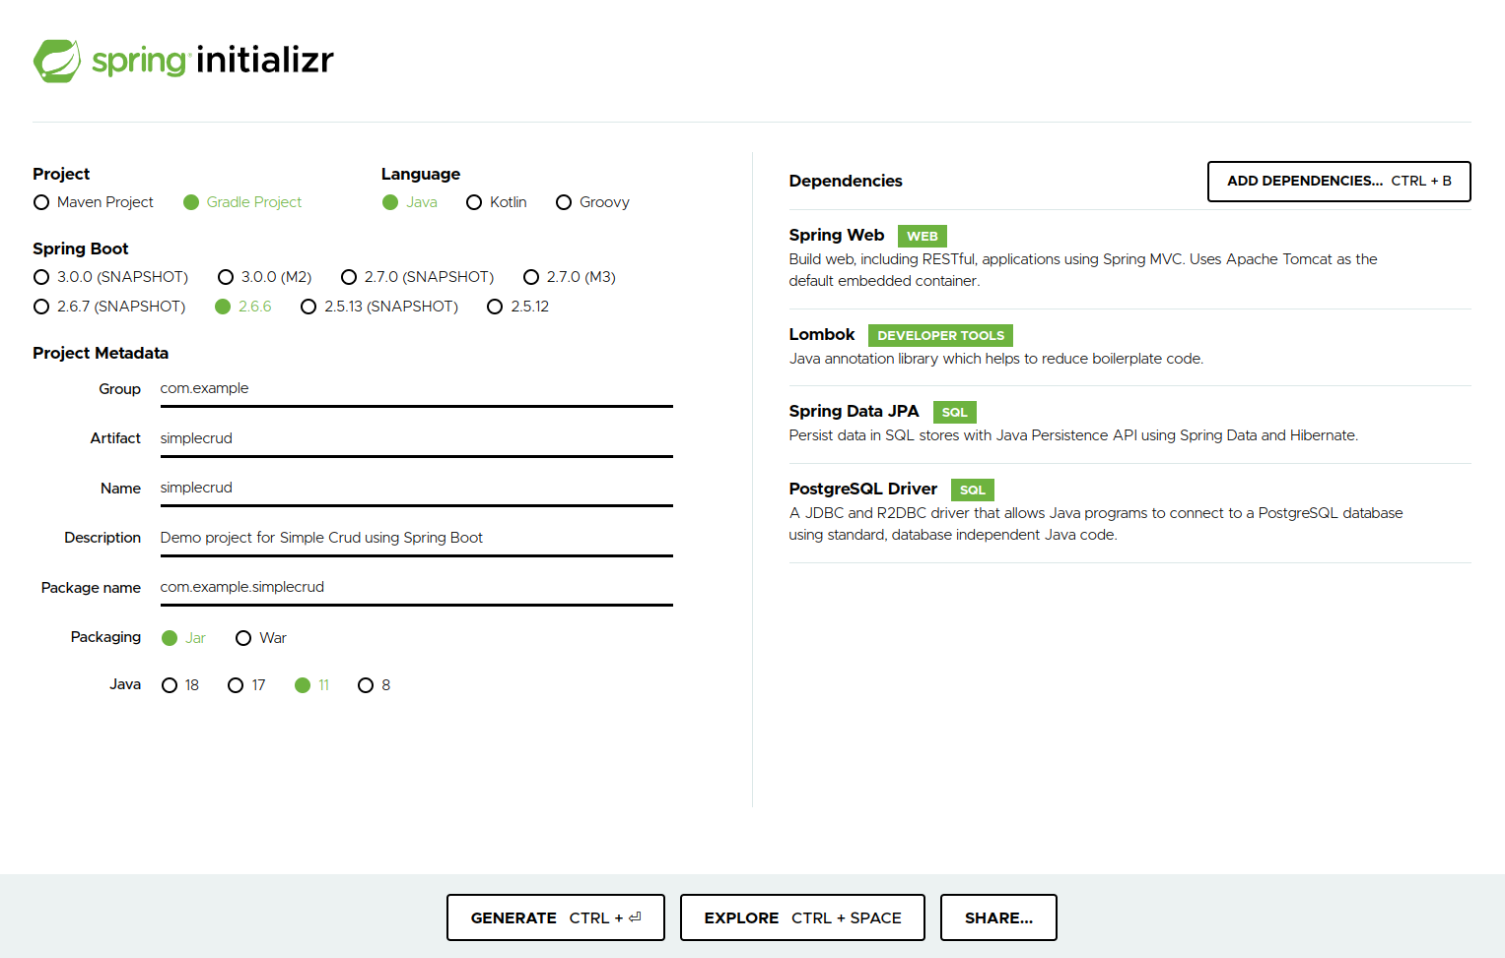
After all configuration is set, click on generate and save the file wherever you want. The file will be a zip one, which you can extract using the unzip application of your choice.
Building Dependencies with Gradle
To install dependencies it’s necessary to have Gradle installed in your machine. If you don’t, you can follow this link (https://gradle.org/install/).
After Gradle is installed, we can start building the application. To handle the code changes and dependencies installation, I recommend that you install Intellij IDEA Community, but If you want to work with Eclipse, feel free.
When you open Intellij IDEA, it’s necessary to select the project we created using Spring initializr:
- Open intellij IDEA
- Click on the button Open
- Find the main ‘springcrud’ folder and click on OK
After the process above, we will see our screen like this.
Intellij IDEA already has a Gradle plugin to install and build dependencies, so it’ll start installing a package that we defined in Spring initializr.
Now we’re going to need to install database configuration.
Installing PostgreSQL Using Docker/Compose
To install postgreSQL database we need to have docker installed. If you don’t, please follow this link.
After Docker is installed, you’ll need to install Docker Compose.
Note: For Windows, Mac or Linux it’s possible to start running by command line using shell commands.
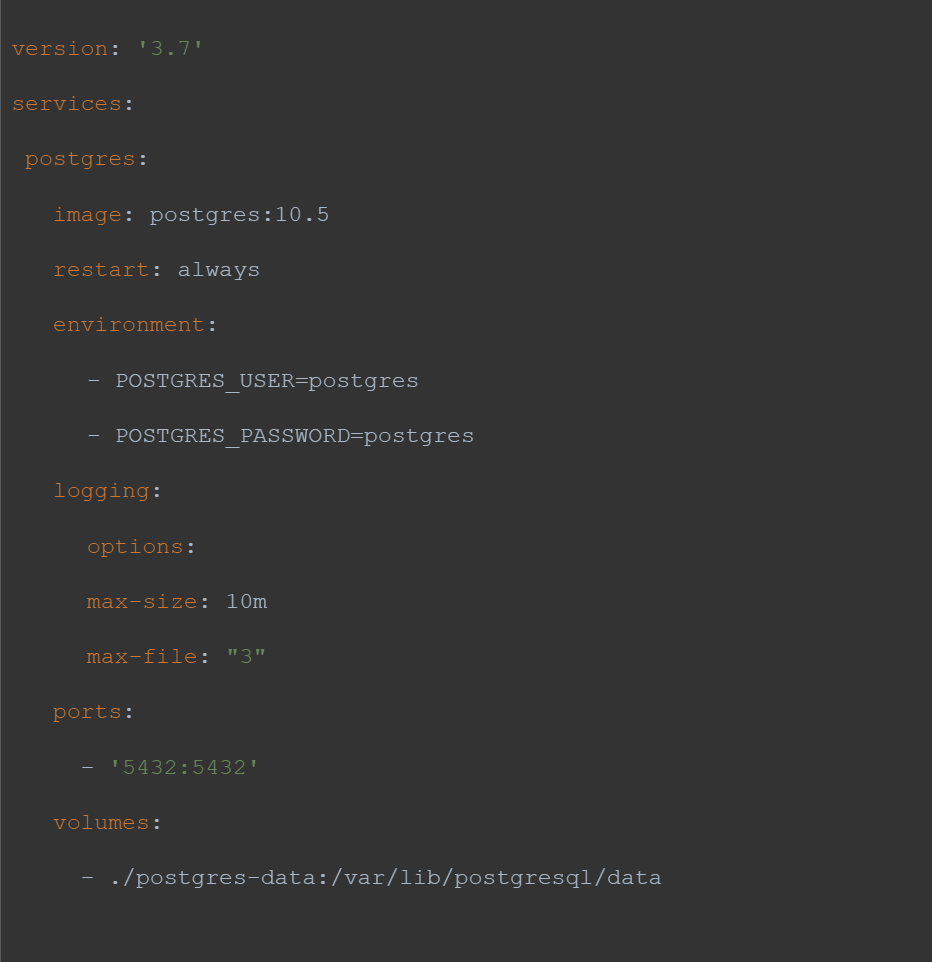
After installing Docker-compose, we’re going to create a docker container with PostgreSQL embedded. On the root of the project (demo folder), create a file docker-compose.yml with the following command below inside.
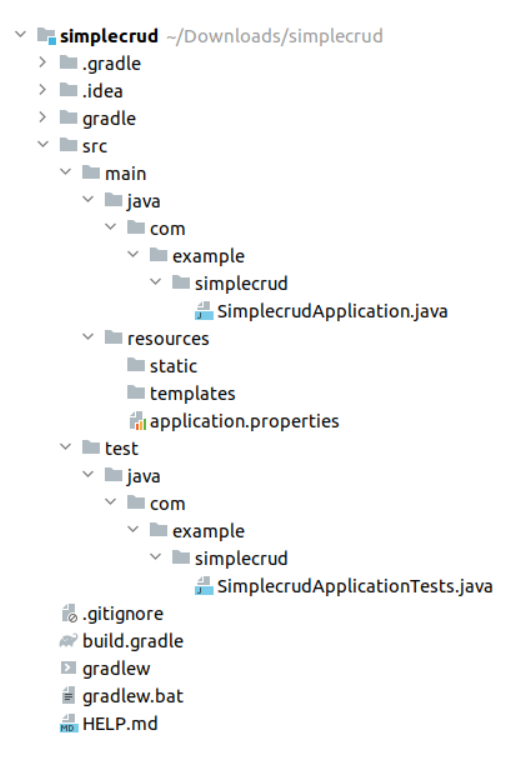
The project architecture will be looking like this at the moment.
Now it’s time to start docker on local.
On a terminal of shell script, execute the following command.

You will get a message of docker built:

Ok, you’re doing great. Now you’ve got your database configs ready for the application to connect. Moving on to make the application connect to the database, we will need to change simple configurations on Spring Data.
Connecting Application With Database
By default, Spring creates a file called application.properties that is responsible for telling significant configuration for Spring with external services or placeholders you need to host on the application. If you want Spring to do everything for you, you need to give it relevant information, and then Spring takes care of it for you.
As we created a PostgreSQL instance database, now we let Spring know about it. Inside the file we mentioned above, insert this information:
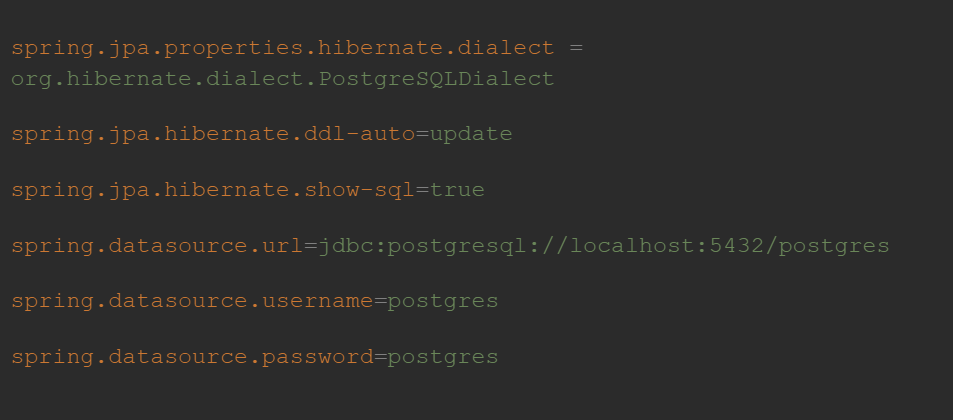
First line: The SQL dialect makes Hibernate generate better SQL for the chosen database.
Second line: hibernate.ddl-auto allows Hibernate to update an existing database with tables and create the table if it does not exist yet. There are other configs of ddl-auto that you are able to create-and-drop a database every time you run the application and tear down, but we decided to keep the changes even if the application is stopped or running in this example.
Third line: Shows SQL when some query runs.
Next lines: It’s all about database credentials.
Running Application for the First Time
Spring initializr has a Gradle embedded, so to start the application we are going to run the following command:

If you got a message like this, you’re on the right path!

Now that we are connected to the database and our application is running on an 8080 port, let’s create our first model for our CRUD.
If you’re working on a terminal or IDE, stop it after this process … we’re gonna make changes! (Stop on terminal = Ctrl + C)
Create Our First API With Spring
We’re going to create a simple CRUD of Customers registration to show a simple example of how Spring Boot works.
Project structure
Let’s start by creating all packages to keep our code organized.
- Creating model package
- On src/main/java/com.example.simplecrud let’s create our first package
- Right button of the mouse inside of project package, New, Package
- Give it “model” name
- Creating a service package
- Repeat the process above and give it the name “service”.
- Repeat the process above and give it the name “service”.
- Creating a controller package.
- The same process as above and give it a “controller” name.
The project will look like:
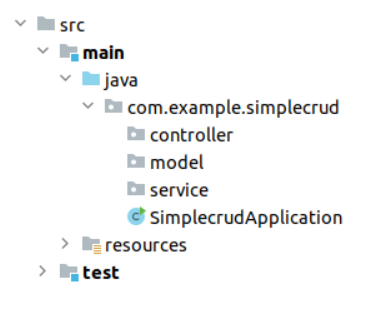
Project Structure Explanation:
- Model – This is the package of the application’s relevant content. It’s where we have our objects and their properties.
- Repository – Spring Data uses a repository to connect our Model with our database using ORM (Hibernate). Everything is related to queries and the database process is going inside of this package/class.
- Service – It’s the interface that exports all business as an interface(contract).
- Controller – This is where we actually expose our API for external access.
Now we have what we need for patterns, let’s dive into Spring Boot.
Model Class
On the model package, click with the Right button, New, Java Class. Name it as “Customer”.
Create some fields like name, age, and whatever you want. We’ll need to have an ID field, and I’ll explain why below. Here is the class I created:
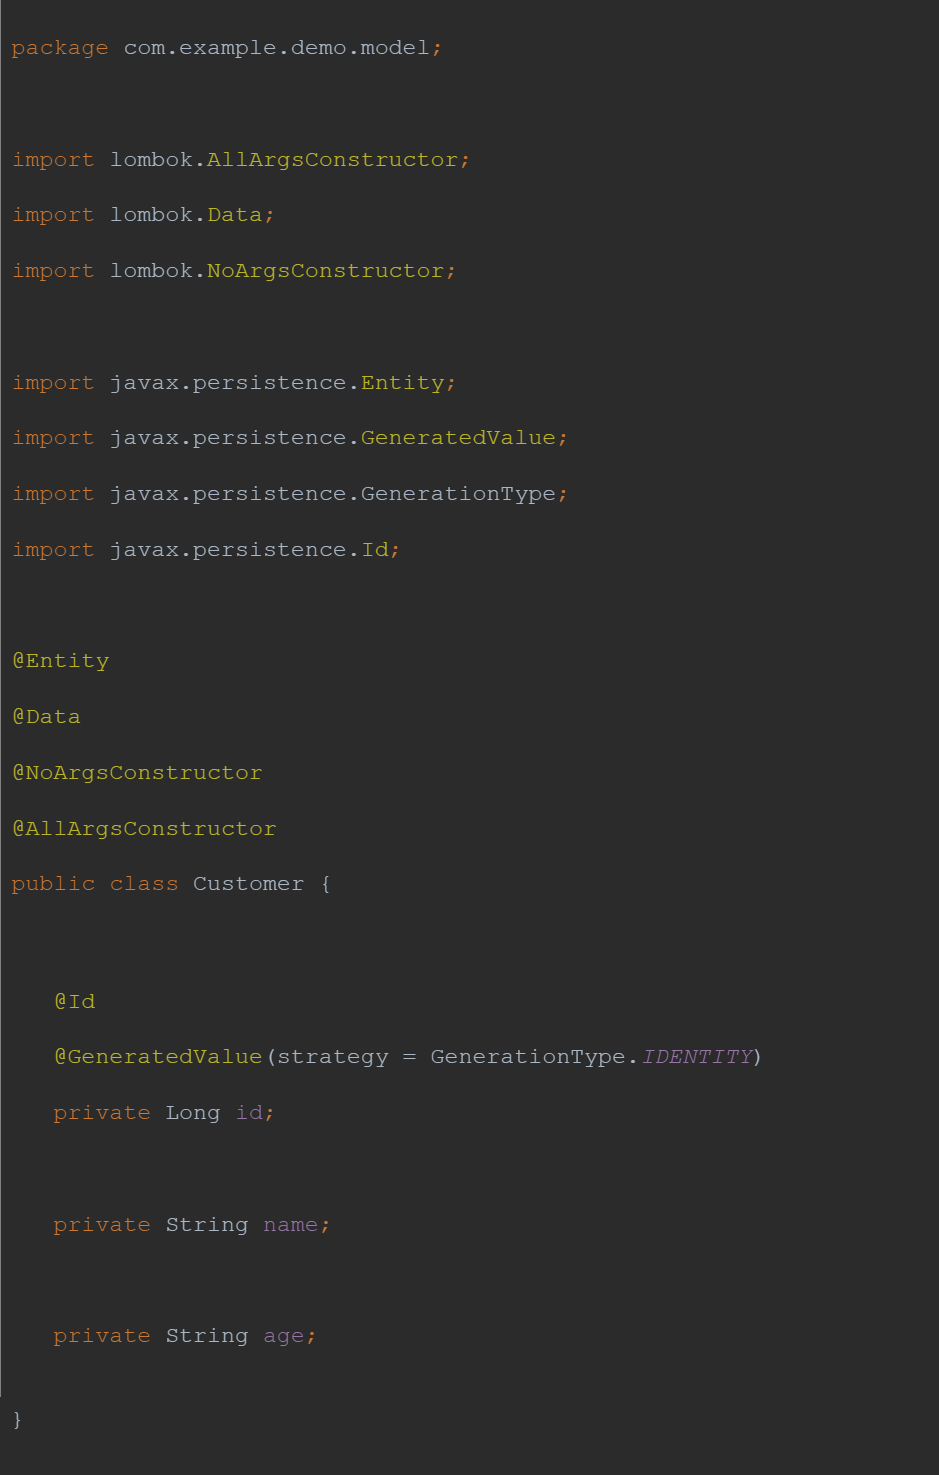
If we take a look at the code above, we can perceive that we have a lot of annotations on that. Let’s explain what each one did for us.
@Entity – Tells Spring Data that it’ll be a table inside a database, or as the name suggests, a database entity.
@Data – It’s about Project Lombok. This annotation eliminates the necessity of creating all getters and setters for each field.
@NoArgsConstructor – Create a constructor for the class with no args.
@AllArgsConstructor – Create a constructor for the class with no all args.
@Id – Tells Spring Data that it’s the unique identifier of the class.
@GeneratedValue(strategy = GenerationType.IDENTITY) – Tells Spring Data that our identifier is going to be serial and auto-incremental.
Note: Remember to import the right dependency on the project when you’re coding. This is why I like to use IDEs. It suggests what you should import for the project when you mention the library you want to work in.
Repository Interface
On the repository package, click with the Right button, New, Java Class, and select Interface. Name it as “CustomerRepository”. Pay attention to the type of file — it’s now an INTERFACE, not a class.
As we mentioned a model with annotation @Entity to let Spring Data know that it’s a table, now we will define this interface as a @Repository annotation to let Hibernate know that we’re going to handle Customer queries inside of it.
The other important thing is that our repository needs to extend the JpaRepository<T, ID> that extends Repository from Spring Data. It helps us to avoid creating common functions as save, delete, update and get because it’s already implemented.
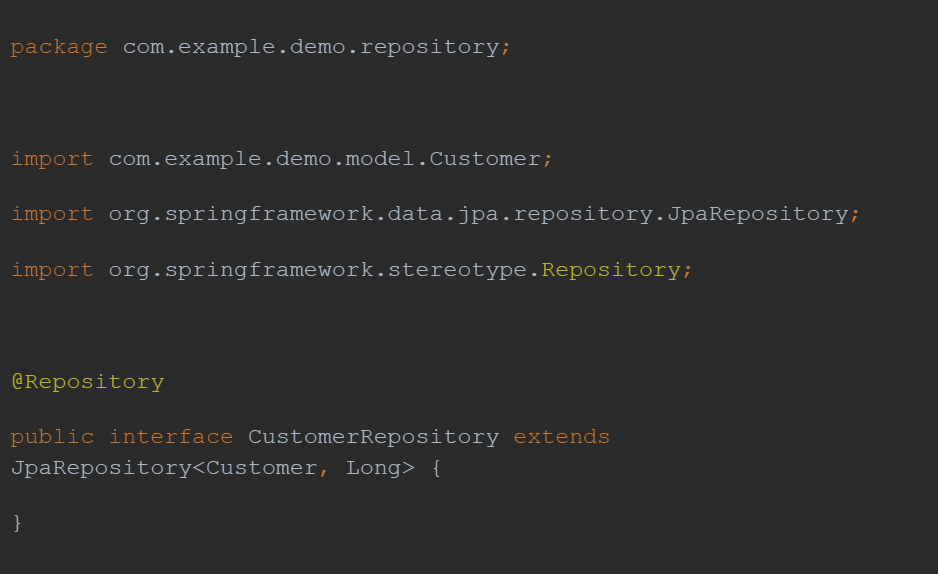
First param of JpaRepository is the class you want to handle inside of this repository and the second is about which type of field is the unique identifier.
Service Interface
On the service package, click with the Right button, New, Java Class, and select Interface. Name it as “CustomerService”.
Again, on the service package, click with the Right button, New, Java Class. Name it as “CustomerServiceImpl”.
Did you recognize that we created two files for this package? Why? Because we want to expose only an interface as a contract and we don’t want those who’re going to implement our interface to know too much about it. Here we just say “Hey, if you want to use me, implement my methods!”
CustomerService is going to have getAll, get, create, update and delete methods on its interface.
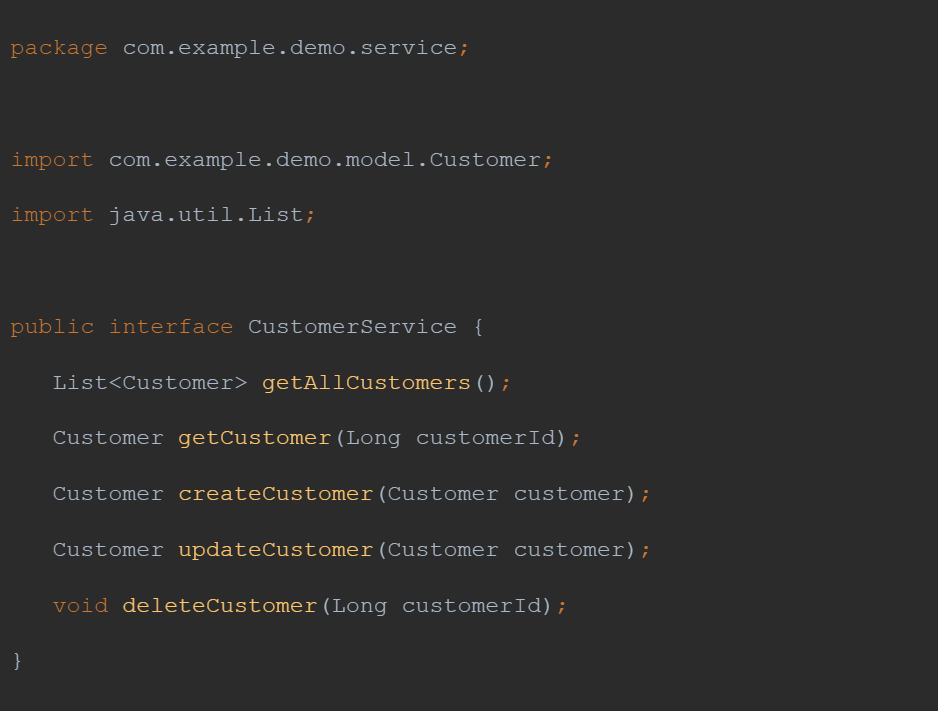
Now let’s implement this interface on CustomerServiceImpl.
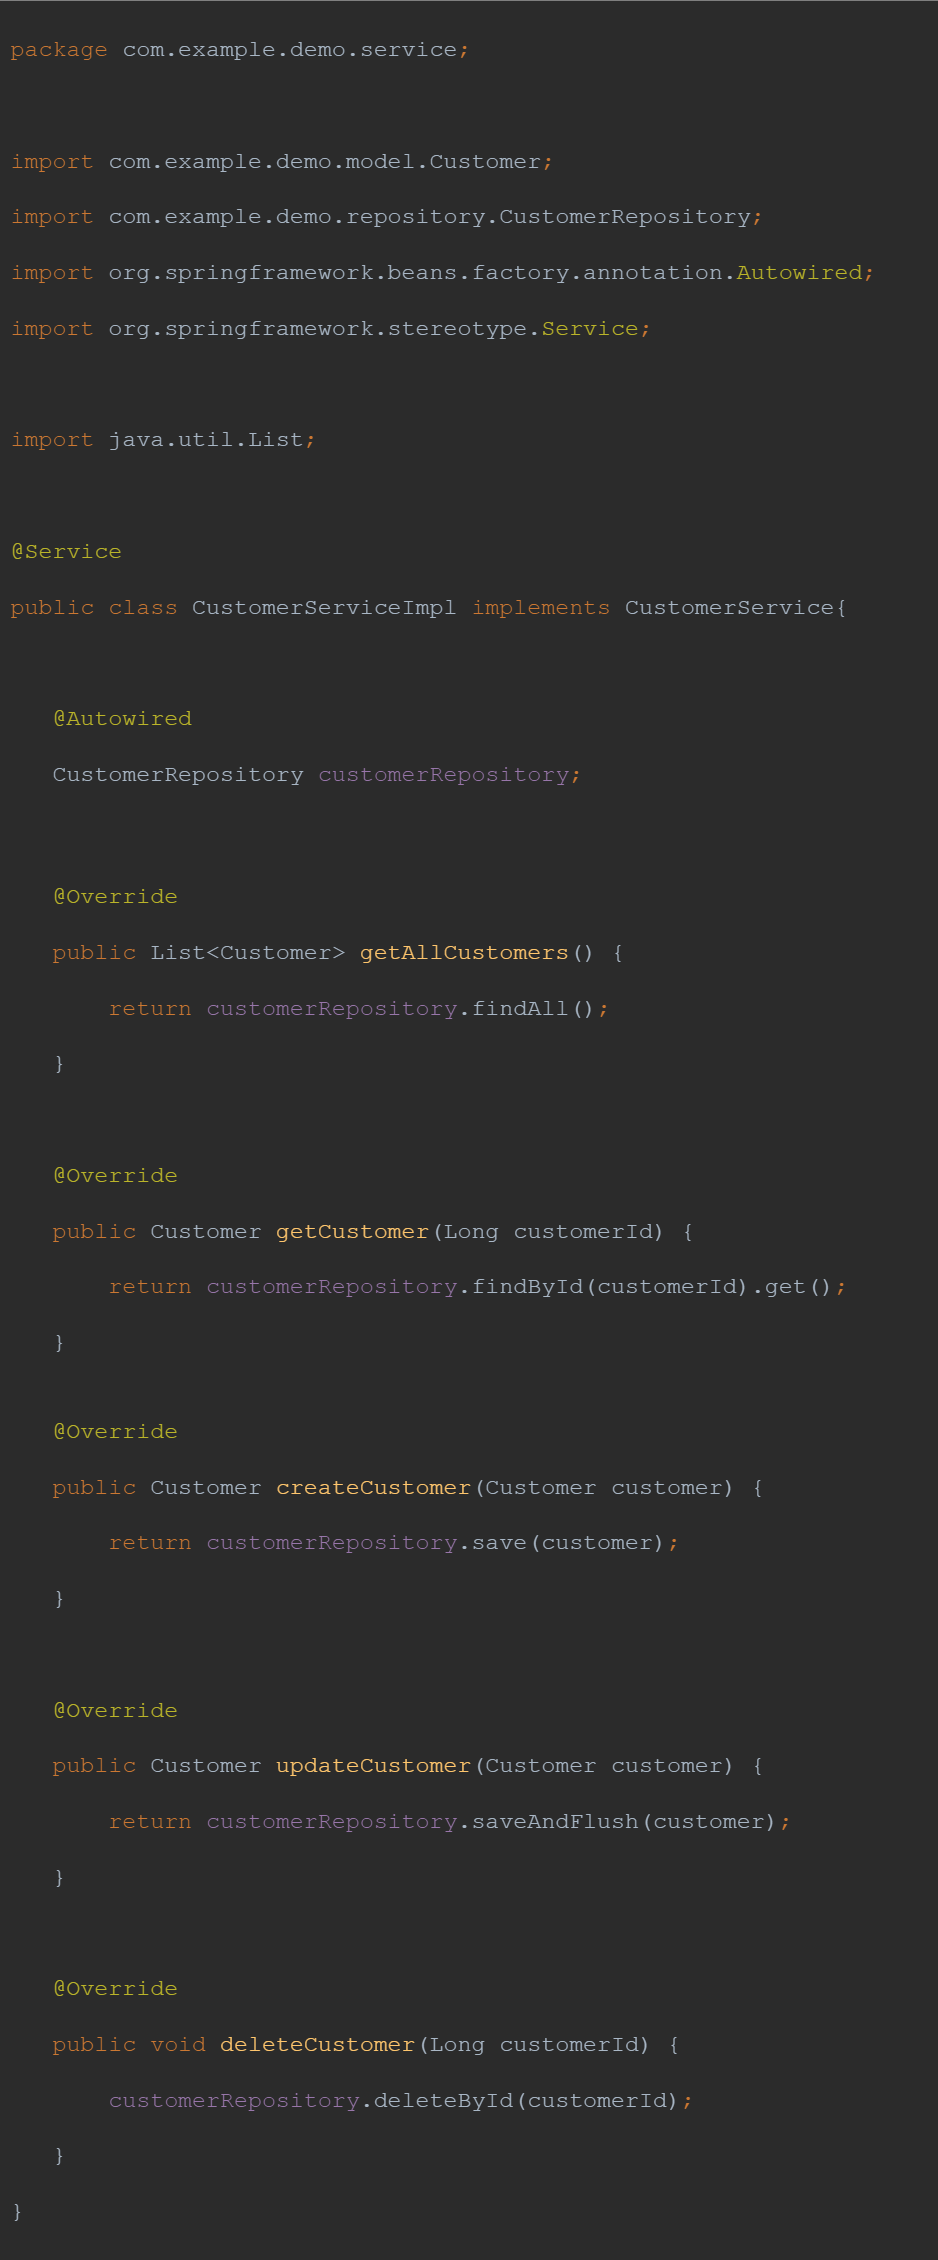
The CustomerServiceImpl implements the interface CustomerService and it has an annotation @Service to let Spring boot know it’s a service layer.
The field @Autowired is how Spring works with Dependency Injection (DI). It allows Spring to resolve and inject collaborating beans into our bean. In this case we’re using the interface CustomerRepository injected on CustomerServiceImpl.
Now that we already have all the business done, let’s expose it as an api.
Controller Class
On the controller package, click with the Right button, New, Java Class. Name it as “CustomerController”.
Now let’s create the code below:
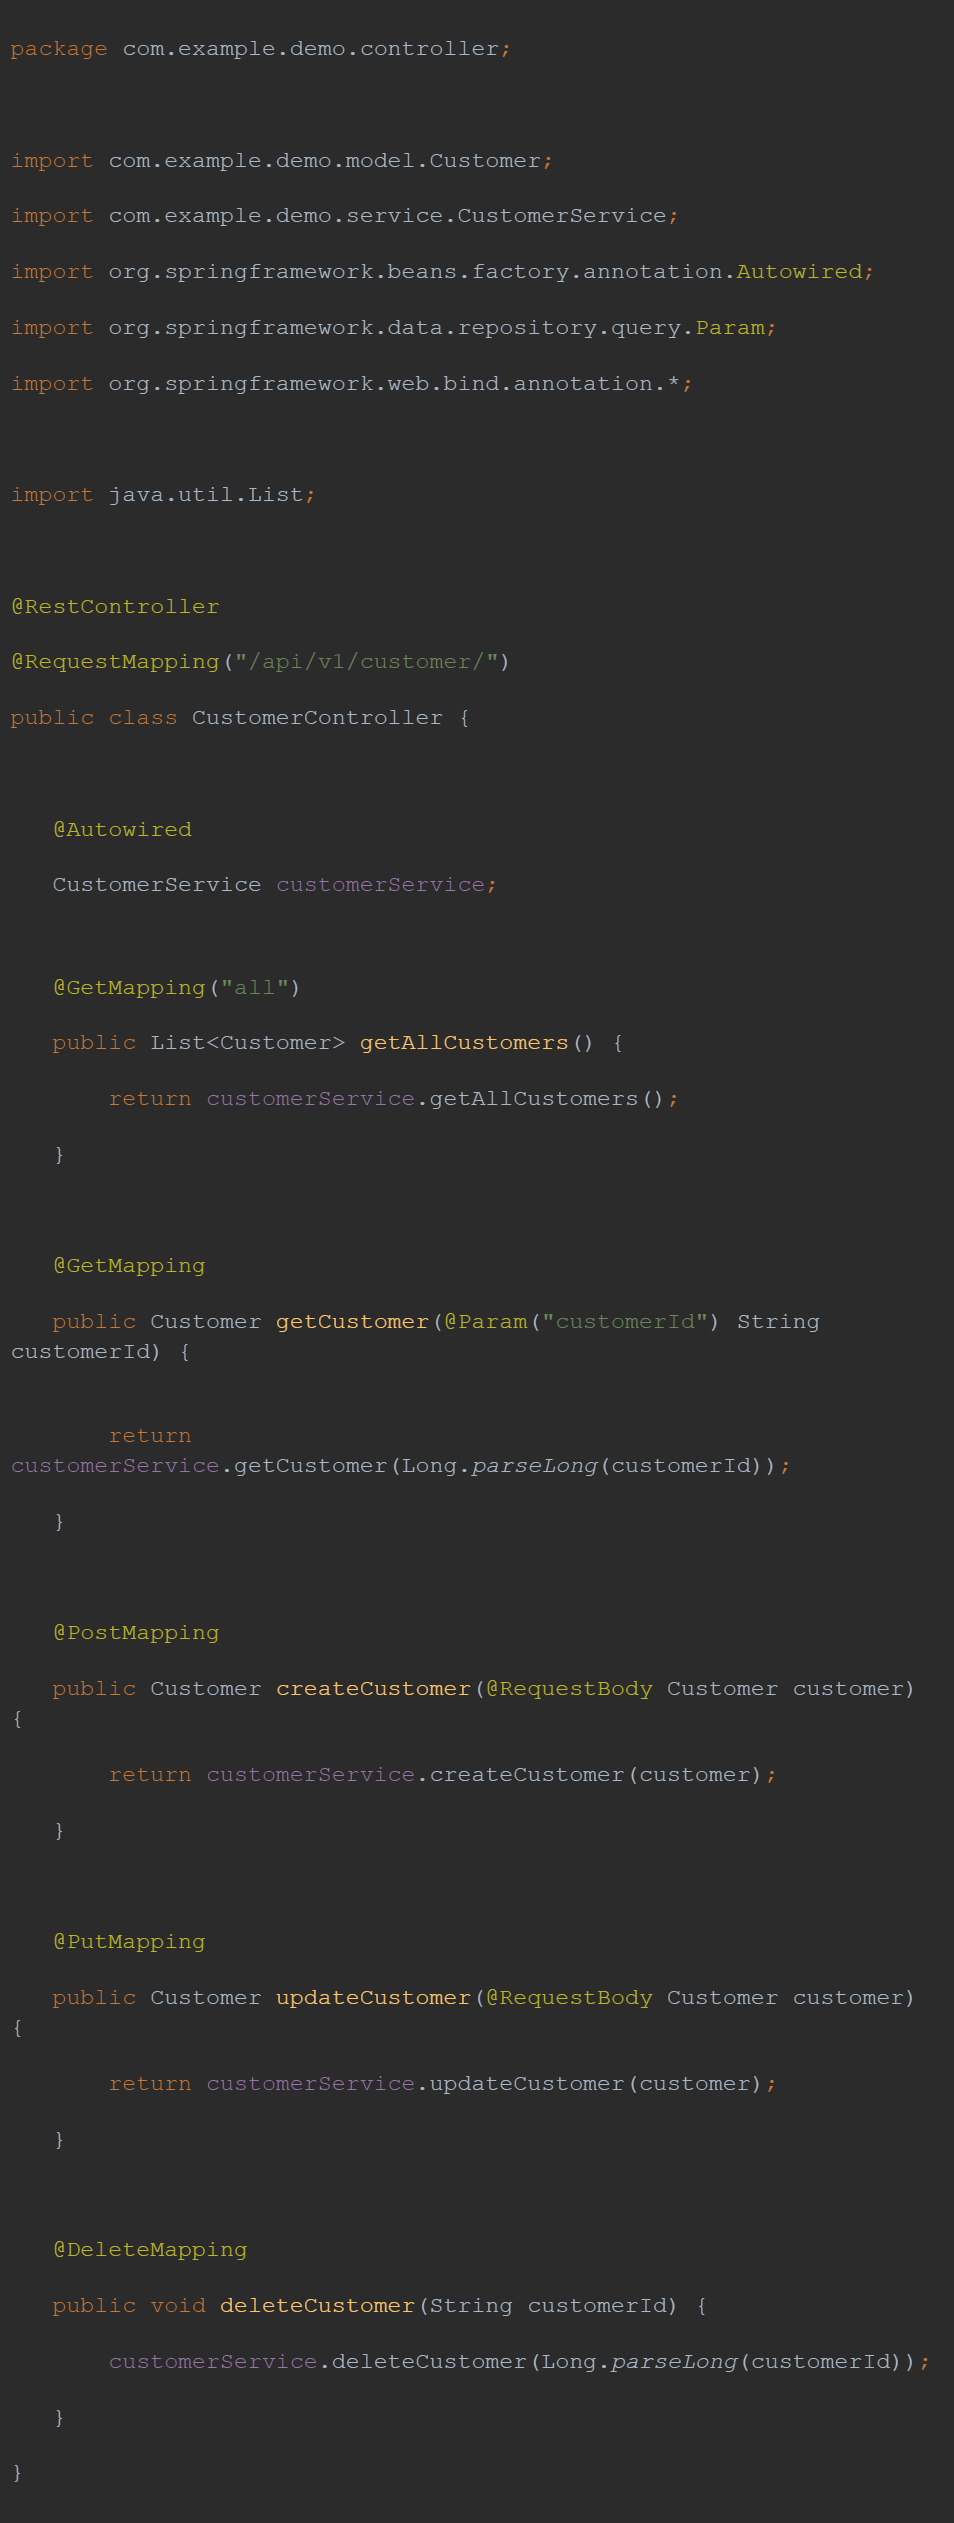
Let’s look at the annotations:
@RestController – Tells to Spring boot that it’s a controller layer
@RequestMapping(“/api/v1/customer”) – That’s the way we can easily tell the api what path (endpoint) we want to define for that controller.
@GetMapping – GET HTTP Method
@PostMapping – POST HTTP Method
@PutMapping – PUT HTTP Method
@DeleteMapping – DELETE HTTP Method
Note: One of our GET methods has (“all”) inside of the param. I did that because if we want to show all of the customers in the database, we can specify the URL, but if we want a specific one, we can send “customerId” as a parameter.
Running the Application After It’s Done
Again, let’s repeat the code we did for the first time running the application.

To request on our API, I would recommend you use Insomnia, Postman or terminal (using Curl).
Insert the first customer
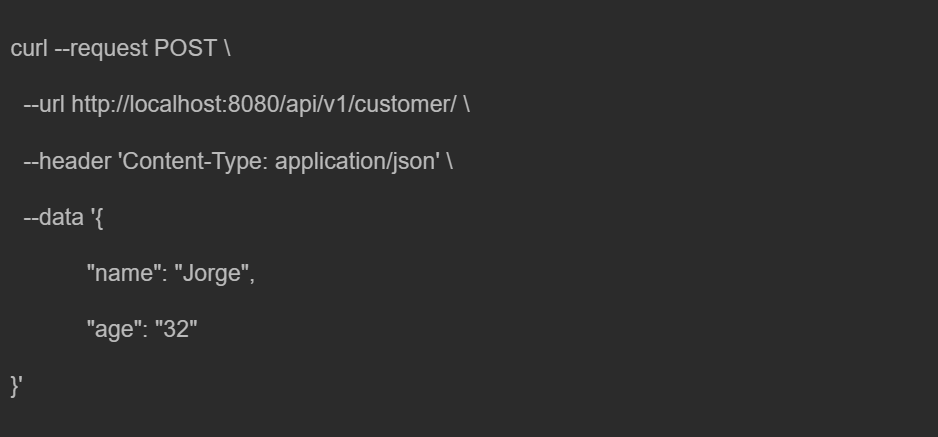
You will probably receive a response like this:

Now that we have our first Customer in our database, lets search it by customer ID.
Get Customer by ID
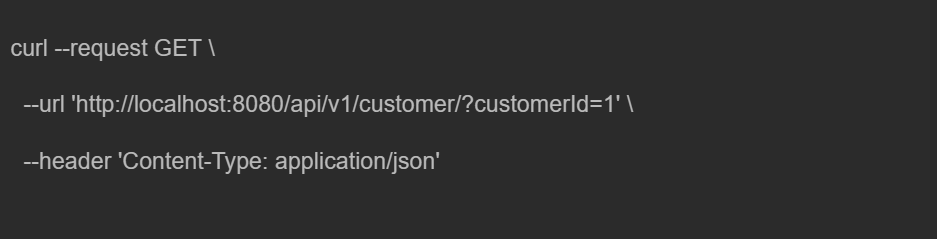
And then we got:

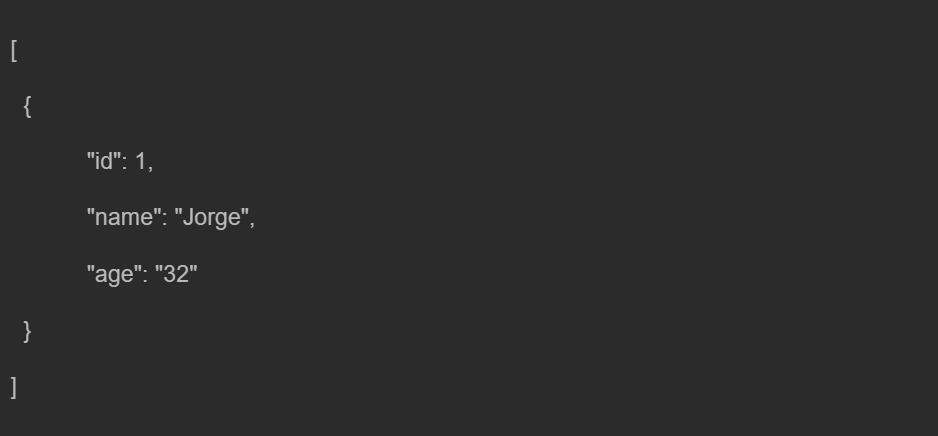
If you want to get all of them, you can use “all” instead of customerId param on the URL. It’ll retrieve a list of customers, but remember — for now, we have only one.
Get All Customers

Response:
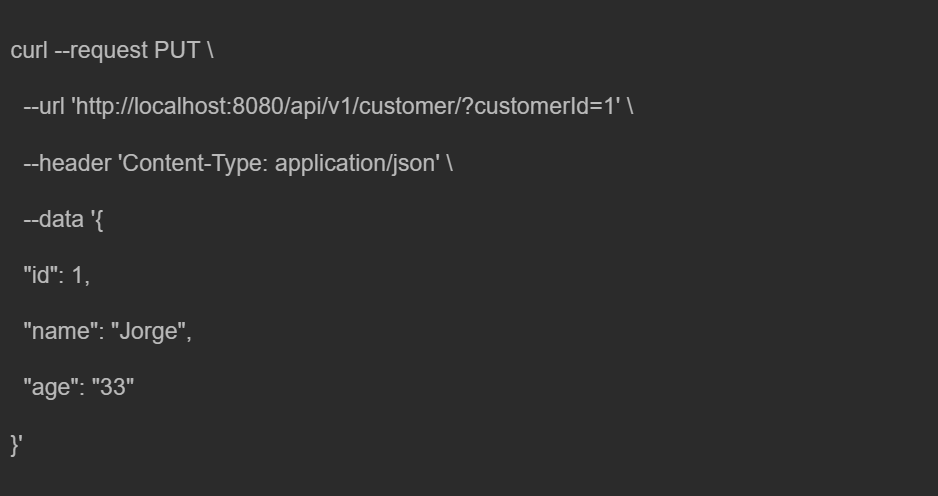
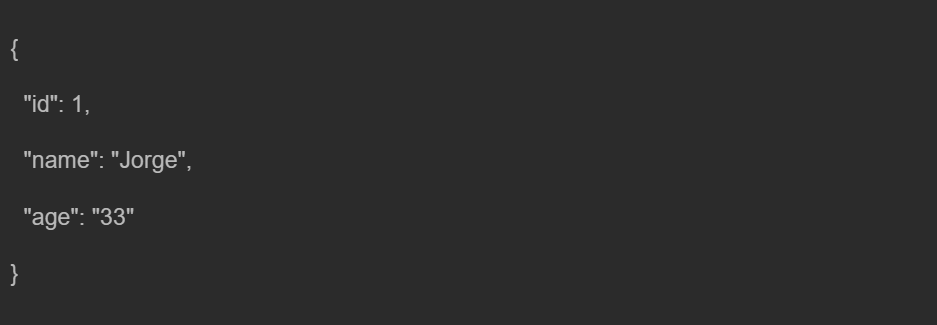
Update Customer
It’s Jorge’s birthday and we need to update his age to 33. We can use the PUT request that we did.
Response:
Delete Customer
And last but not least, Delete method.

Final Considerations
My intention with this simple tutorial is not to go deep into Spring’s powerful features, but to explain how to easily create a simple CRUD using Java and breaking all the old paradigms of the old Java and its verbosity. Spring boot helps Java to create a minimal and performative environment for a huge Restful API.
About

Hi, my name Is André and I have been working as a Software Engineer for 10 years, mostly with Java coding but I have experience with Python and NodeJS too. I have worked in big companies in Brazil and abroad, which is where I gained the experience to work with APIs and microservices on a large scale. As a community leader, my role is to help my colleagues achieve their professional goals and maintain good relationships between the company and the people. I am passionate about technology and this is what I want to do for the rest of my life.
Join Softensity’s Team